

Installing clean databases on an existing K2.net™ 2003 Server (SP1a) installation
KB000041
PRODUCTK2.net 2003
TAGSMicrosoft SQL
LEGACY/ARCHIVED CONTENT
This article has been archived, and/or refers to legacy products, components or features. The content in this article is offered "as is" and will no longer be updated. Archived content is provided for reference purposes only. This content does not infer that the product, component or feature is supported, or that the product, component or feature will continue to function as described herein.
This article explains how to replace the currently installed K2.net™ 2003 databases with clean databases.
| The K2.net™ 2003 installer application may be used to remove the currently installed K2.net™ 2003 databases (K2 and K2Log), and replace them with new, clean databases.
| |||
| 1. | On the K2.net™ 2003 Server machine, open the "Add or Remove Programs" application from the Control Panel. Select "K2.net 2003 Service Pack 1a" from the "Currently Installed Programs" list and click the "Change" button. | ||
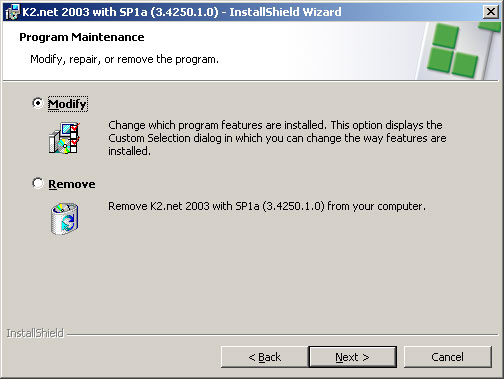
| 2. | The program maintenance screen will be displayed – click on the ‘Modify’ option as indicated: | ||
 | |||
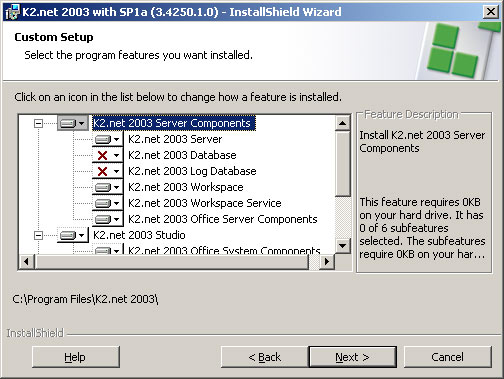
| 3. | On the "Custom Setup" screen, de-select the "K2.net 2003 Database" and "K2.net 2003 Log Database" components, as indicated: | ||
 | |||
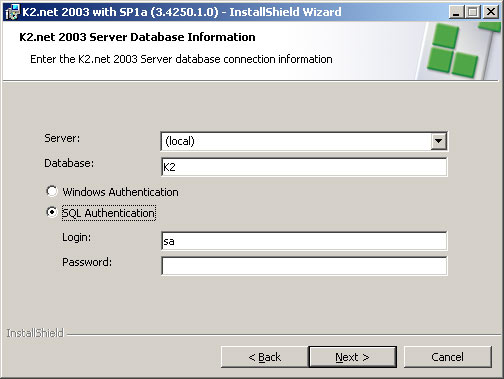
| 4. | On the "K2.net 2003 Server Database Information" screens, enter the details of your existing K2.net™ 2003 databases (K2 and K2Log). Note: You must use the same settings as were specified during the initial installation of K2.net™ 2003 (the same server name and authentication settings), for example: | ||
 | |||
| 5. | Continue with the rest installation process as normal.
| ||
| 6. | Using a SQL script or the Microsoft® SQL Server Enterprise Manager, delete the K2 and K2Log databases from the specified SQL Server. | ||
| 7. | Once you have deleted the existing databases, run the "Add or Remove Programs" application from the Control Panel again. Select "K2.net 2003 Service Pack 1a" from the "Currently Installed Programs" list and click the "Change" button. | ||
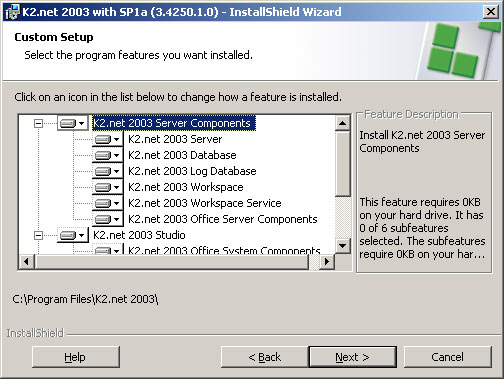
| 8. | Once the "Custom Setup" screen has been reached, select the "K2.net 2003 Database" and "K2.net 2003 Log Database" components as indicated: | ||
 | |||
| 9. | On the "K2.net 2003 Server Database Information" screens, enter the details for your new K2.net™ 2003 databases (K2 and K2Log).
| ||
 | |||
| 10. | Continue with the installation process as normal. The new (clean) K2 and K2Log databases will be created in the specified SQL server once the installation wizard has completed. | ||
