

Enabling SQL Server Transaction Support from K2.net™ 2003 Studio
This article describes the steps involved for enabling K2.net™ 2003 Studio to use Transaction Processing on a SQL Server database.
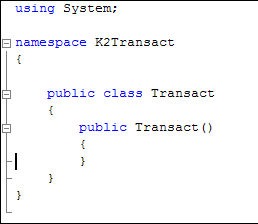
| Transaction Processing When you purchase an item from an online store, you exchange money (in the form of credit) for the item. If your credit is good, a series of related operations ensures that you get the item and the store gets your money. However, if a single operation in the series fails during the exchange, the entire exchange fails. You do not get the item and the store does not get your money. The technology responsible for making the exchange balanced and predictable is called transaction processing. Transactions ensure that data-oriented resources are not permanently updated unless all operations within the transactional unit complete successfully. By combining a set of related operations into a unit that either completely succeeds or completely fails, you can simplify error recovery and make your application more reliable. A transaction is a set of related tasks that either succeed or fail as a unit. In transaction processing terminology, the transaction either commits or aborts. For a transaction to commit, all participants must guarantee that any change to data will be permanent. Changes must persist despite system crashes or other unforeseen events. If even a single participant fails to make this guarantee, the entire transaction fails. All changes to data within the scope of the transaction are rolled back to a specific set point. Automatic transaction processing is a service provided by COM+ that enables you to configure a class at design time to participate in a transaction at run time. To use this service, the class must derive directly or indirectly from the: System.EnterpriseServices.ServicedComponent class. Writing Serviced Components A serviced component is the mechanism that enables COM+ services to be available to .NET Framework classes. You can modify any Common Language Specification (CLS)–compliant class to use COM+ services. The System.EnterpriseServices namespace provides custom attributes and classes for accessing these services from managed code. Start a new C# Class Library Project and call it “K2Transact”. Rename the default “Class1.cs” file to “Transact.cs” and the “Class1” class and constructor names in the code module to “Transact”. Delete all comments added automatically by Visual Studio.NET. Your “Transact.cs” class module should now look like the following illustration. | |||
 | |||
| You can remove the System.XML reference from your project and add the following reference(s) to your project:
using System.EnterpriseServices; using System; using System.Data; using System.Data.SqlClient; using System.Runtime.InteropServices; [assembly: ApplicationName("K2Transact")] [assembly: ApplicationActivation(ActivationOption.Library)] [assembly: ApplicationAccessControl(Value = false, Authentication = AuthenticationOption.None)]
| |||
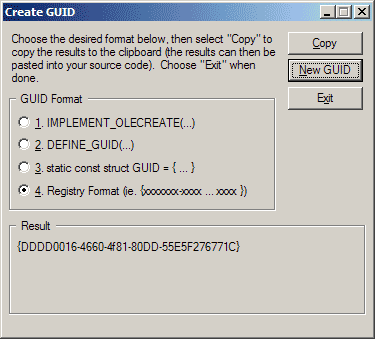
| Just after the K2Transact Namespace declaration, we need to add a unique COM+ interface GUID. To generate a unique GUID for the interface, select the “Create GUID” item from the “Tools” menu. Select the “Registry format” radio button and click on the “New GUID” button. Copy and paste the newly created GUID into your code just after the K2Transact namespace declaration and enclose it into a System.Runtime.Interop.GuidAttribute of the form: [Guid("<Generated GUID>")]. | |||
 | |||
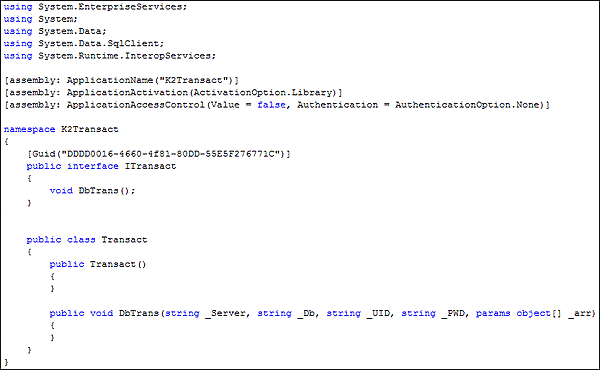
| Add the following COM+ interface declaration after the generated GUID as well as the exposed method declaration to your “Transact” class (after the “Transact” constructor):
public interface ITransact { void DbTrans(); } public void DbTrans(string _Server, string _Db, string _UID, string _PWD, params object[] _arr) { }
| |||
| Your code module should now look something like the following: | |||
 | |||
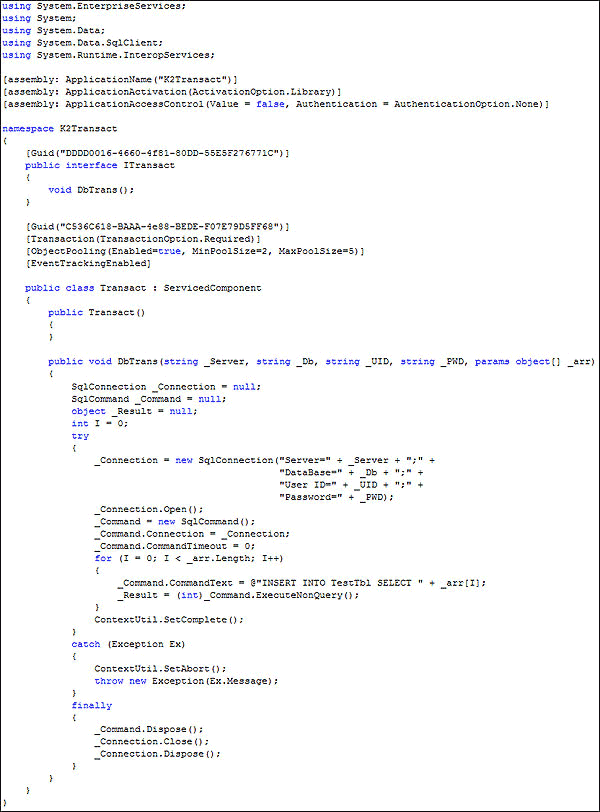
| After the interface GUID and declaration, we also need to generate a unique GUID for our “K2Transact” object. Generate another unique GUID as described earlier and paste it after the interface definition but before the “Transact” class declaration. After this second GUID, add the following attributes:
[Transaction(TransactionOption.Required)] [ObjectPooling(Enabled=true, MinPoolSize=2, MaxPoolSize=5)] [EventTrackingEnabled]
| |||
| Change your “Transact” class declaration to inherit from the ServicedComponent class
SqlConnection _Connection = null; SqlCommand _Command = null; object _Result = null; int I = 0; try { _Connection = new SqlConnection("Server=" + _Server + ";" + "DataBase=" + _Db + ";" + "User ID=" + _UID + ";" + "Password=" + _PWD); _Connection.Open(); _Command = new SqlCommand(); _Command.Connection = _Connection; _Command.CommandTimeout = 0; for (I = 0; I < _arr.Length; I++) { _Command.CommandText = @"INSERT INTO TestTbl SELECT " + _arr[I]; _Result = (int)_Command.ExecuteNonQuery(); } ContextUtil.SetComplete(); } catch (Exception Ex) { ContextUtil.SetAbort(); throw new Exception(Ex.Message); } finally { _Command.Dispose(); _Connection.Close(); _Connection.Dispose(); }
| |||
| At this stage your COM+ Transaction wrapper is complete and your code module should look similar to the following illustration. | |||
 | |||
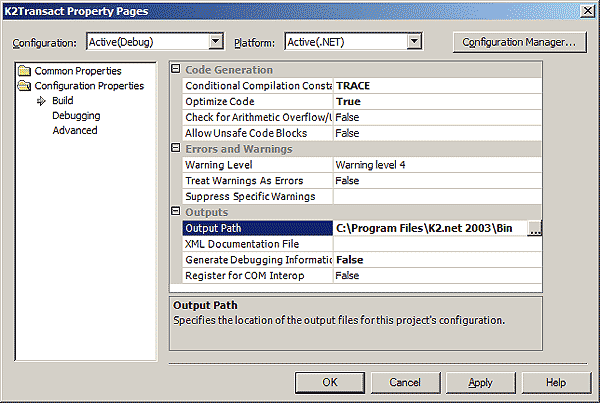
| Set the ConditionalCompilationConstants to TRACE, Optimize Code to True, the Output Path of the project to “<drive>:Program FilesK2.net 2003Bin” and Generate Debugging Information to False. | |||
 | |||
| Build your solution by selecting “Batch Build” from the “Build” menu. Select the Debug and Release version to be built and make sure that no errors occurred.
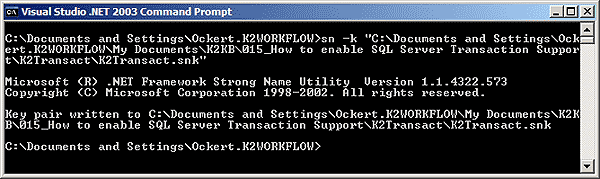
For an assembly to be registered in the GAC, we must generate a strong name for the assembly, update the “Assembly.cs” file with the appropriate entries and rebuild the solution. An assembly strong name can be generated by the Visual Studio Command Line Utility. Open the command line utility by selecting Start | All Programs | Microsoft Visual Studio.NET 2003 | Visual Studio .NET Tools | Visual Studio .NET 2003 Command Prompt. Type in and execute the following command: | |||
 | |||
| Update your “AssemblyInfo.cs” file and specifically the following entries to the following values:
[assembly: AssemblyTitle("K2Transact")] [assembly: AssemblyKeyFile("..\..\K2Transact.snk")] [assembly: AssemblyKeyName("K2Transact")]
| |||
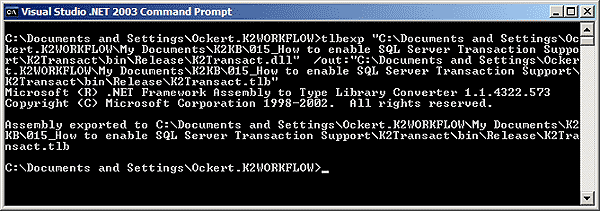
| Save your Visual Studio.NET project and rebuild the solution. To generate a Type Library, execute the following command in the same VS.NET command line utility: tlbexp “[Path to compiled Project Library file][Project Name].dll” /out:”[Path to compiled Project Library file] [Project Name].tlb” | |||
 | |||
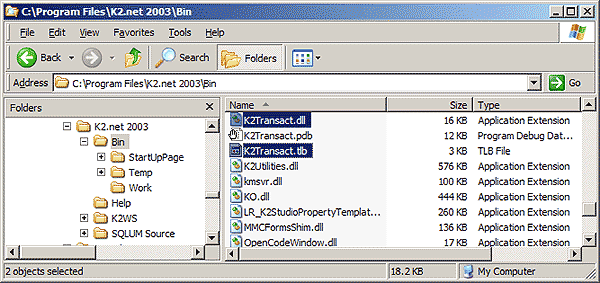
| In order for the service to be successfully registered with COM+, we need the Type Library (.tlb) file created by the build process to be in the same directory as the library. Copy the “K2Transact.tlb” file from your project’s “…inRelease” directory to “<drive>:Program FilesK2.net 2003Bin”. You should now have both the “.dll” and “.tlb” files in this directory. | |||
 | |||
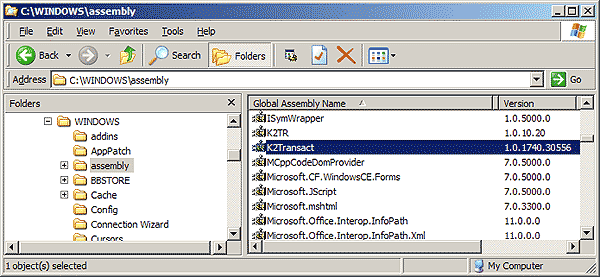
| To register the .NET Framework class in the GAC, drag and drop the “K2Transact.dll” file into the “<drive>:WINDOWSassembly” directory. | |||
 | |||
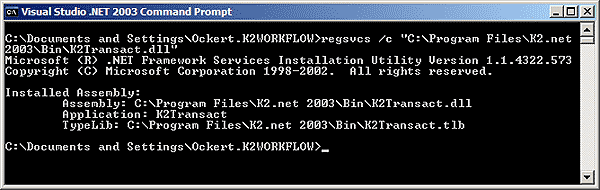
| Now we must still register the .NET Framework class with COM+. In order to do this, we can use a utility called “regsvcs” called from within a VS.NET command prompt. Open the VS.NET command prompt utility as described previously and execute the following command: regsvcs /c “<drive>:Program FilesK2.net 2003BinK2Transact.dll” | |||
 | |||
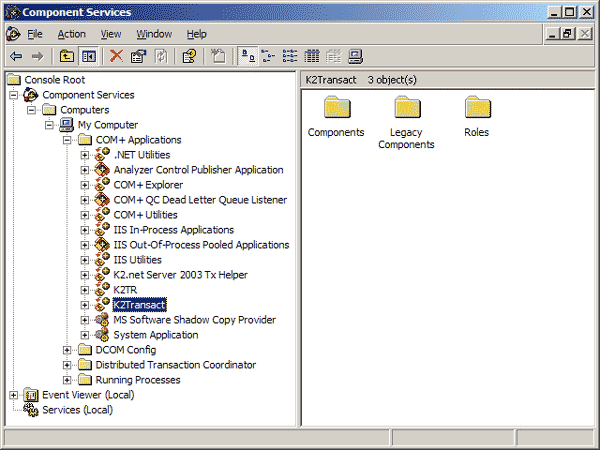
| Make sure that the component has been registered with COM+ by opening the Component Services Utility (Start | Administrative Tools | Component Services). | |||
 | |||
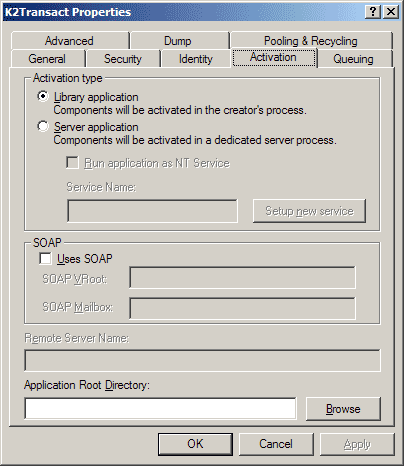
| Right-click on the “K2Transact” COM+ Application and select “Properties”. Make sure that the “Activation Type” property on the “Activation” Tab is set to “Library Application”. | |||
 | |||
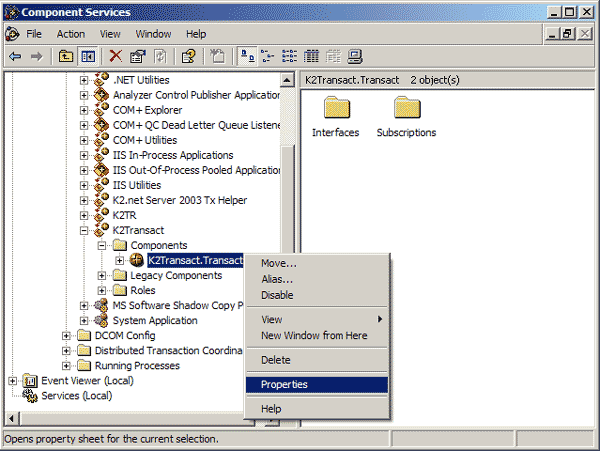
| Expand the COM+ application entry further to component level. Right-click the “K2Transact.Transact” component and select “Properties” from the context menu. | |||
 | |||
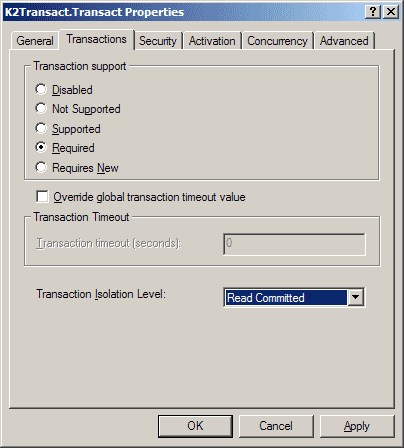
| Select the “Transactions” Tab. Make sure that “Transaction Support” is set to “Required” and “Transaction Isolation level” is set to “Read Committed”. | |||
 | |||
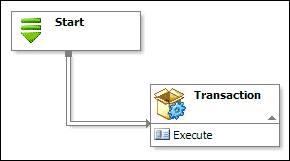
| Apply the changes and close the Dialog box. Test K2.net™ 2003 with Transaction processing support Create a simple K2.net™ 2003 Studio process that resembles the following: | |||
 | |||
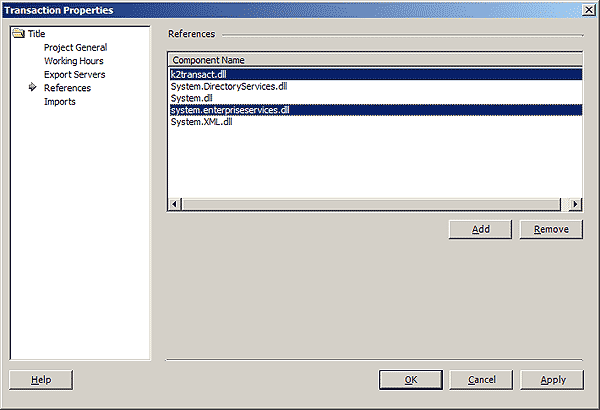
| Add the following references to the K2.net™ 2003 Studio Project | |||
| • | System.EnterpriseServices | ||
| • | K2Transact | ||
 | |||
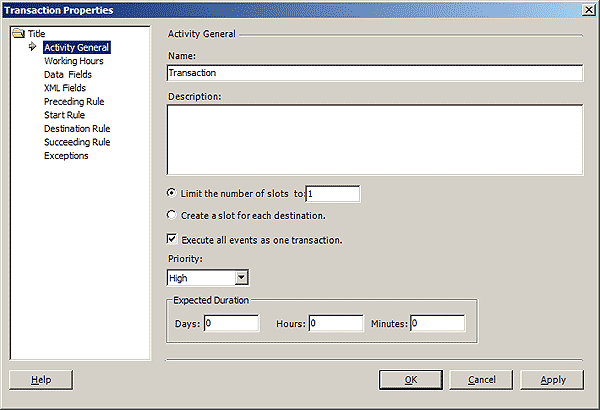
| Change the “Properties” of the “Transaction Activity” to “Execute all events as one transaction”. Please note that you can only have server events in this Activity and not Client and Server events mixed. | |||
 | |||
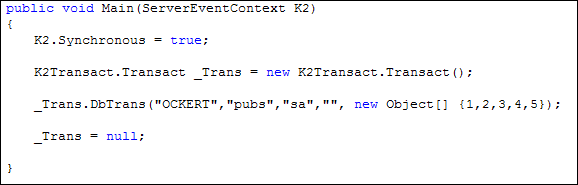
| Edit the “Event Item” code of the “Execute” Server event to resemble the following: | |||
 | |||
| Save the K2.net™ 2003 Studio Solution and export it to the K2.net™ 2003 Server.
_Command.CommandText = @"INSERT INTO TestTbl SELECT " + _arr[I];
to our .NET assembly and the line:
_Trans.DbTrans("<server>","pubs","sa","", new Object[] {1,2,3,4,5});
| |||
| to our Execute Server event handler. The configuration of the new table should be as follows: | |||
 | |||
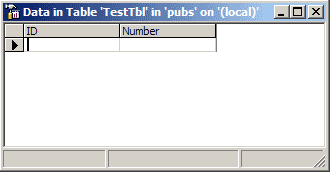
| Verify that the table is empty. | |||
 | |||
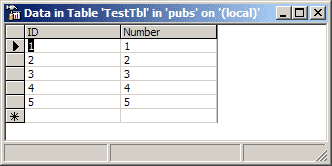
| Start the K2.net™ 2003 process. Verify through K2.net™ 2003 Server in console mode that the process has completed. You can also look at the Error Profiles in K2.net™ 2003 Service Manager for any errors which may have occurred. If the process has been completed successfully, the entries in “TestTbl” should be as follows. | |||
 | |||
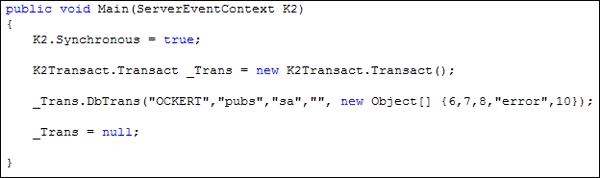
| To test the rollback functionality of the transaction processing, we can change our “Execute Server” event item code to the following | |||
 | |||
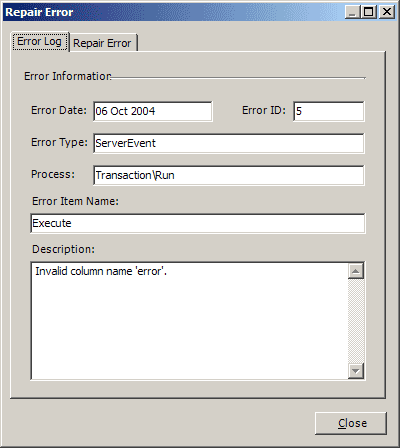
| Save the K2.net™ 2003 Studio Solution and Export the process again to the K2.net™ 2003 Server. Start the process again and verify through K2.net™ 2003 Server in console mode and K2.net™ 2003 Service Manager’s “Error Profiles” that an error has occurred. | |||
 | |||
| Verify that the “TestTbl” still contains the same entries | |||
 | |||
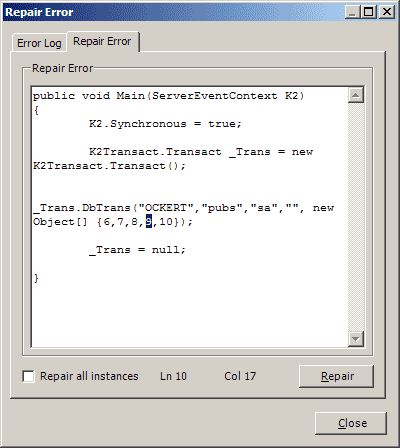
| Repair the error in K2.net™ 2003 Service Manager and validate the entries in the “TestTbl again”. | |||
 | |||
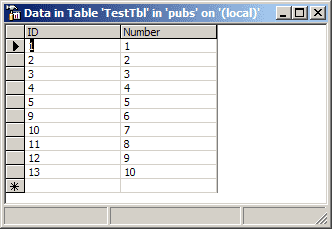 | |||
| The transaction has rolled back and committed successfully after the error was repaired. | |||
