

How To: Configure OpenLDAP for use with K2
Step 1: Install OpenLDAP
In order to properly install OpenLDAP, you must select a server that doesn’t already have Active Directory installed/configured. Reason being is that AD will occupy port 389, which is the same one that the OpenLDAP service will use. It’s also not possible to change the port, as it will still conflict.
Download the OpenLDAP software for Windows from this location: http://www.userbooster.de/en/download/openldap-for-windows.aspx
Run the install on the non-AD server, leaving the defaults in the installer. Once it’s done, you should see a screen that looks similar to this: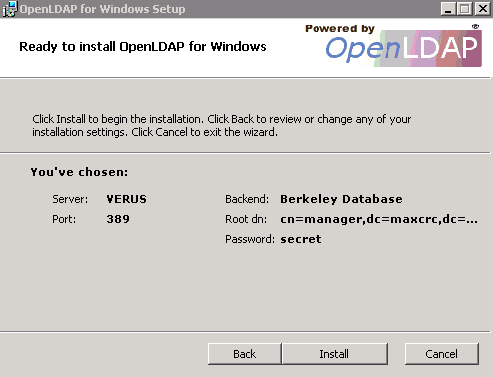
Verify that the OpenLDAP service is installed correctly and running by going to the Windows services MMC and verifying that the service is started.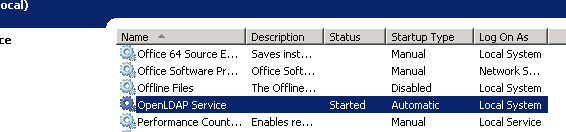
If OpenLDAP Service is successfully shown as started, open a command prompt to the following location: C:Program Files (x86)OpenLDAPClientTools. Then run the following command in the browser to do a search and confirm that the dn is correct.
Your results should look something like the following:
Step 2: Configure OpenLDAP
Once you’ve confirmed that OpenLDAP is installed and running, you must set up some user/group accounts. The easiest way to accomplish this is to download a LDAP Admin tool. There is a free admin tool located at http://www.ldapadmin.org/ that makes it easier to add users and organization units, versus having to run the command line scripts.
Create a couple of user accounts that you can have available for testing, such as the following structure: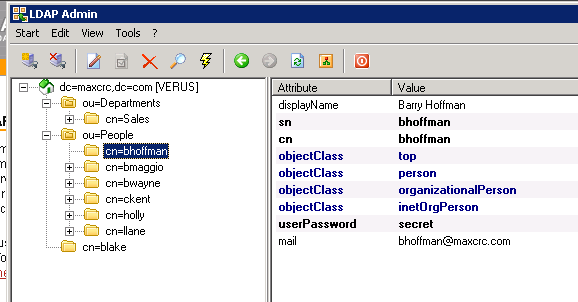
Once these accounts are configured, the K2 configuration can be started.
Step 3: Configure K2
Log into the server that you want to set up with the K2 LDAP User Manager. Make sure that you can communication with the LDAP server you just configured.
Open Microsoft SQL Server Management Studio and open the K2 LDAP User Manager (Trusted - Setup) FOR EC2.sql script in the zip file attached to this article.
This script is configured towards the OpenLDAP protocol. If you left the default attributes when you configured your accounts, you should be close to the correct mappings. The main part that should be focused on is the LDAP server connection attribute:
<AuthInit>
<LdapConnection
LdapServer="ec2-50-16-141-109.compute-1.amazonaws.com"
LdapServerPort="389"
In this specific example, it is connecting to an Amazon EC2 instance, but it can have the server name or IP address that would correctly identify it. In addition, set the LDAP authentication type to Basic and make sure you have the correct username and password. The default for OpenLDAP should be similar to the following:
LdapAuthTypeConnect="Basic"
LdapAuthTypeAuthenticateUser="Basic"
LdapResolveAuthenticationUserToDistinguishedName="true"
LdapAutoBind="false"
LdapScope="Subtree"
LdapConnectIntegrated="true"
LdapConnectUserName="manager"
LdapConnectUserPassword="secret"
After verifying the rest of the mappings are configured correctly by looking at the attribute values on the LDAP server, run the script in the K2HostServer database.
| Important: Do not modify the label name of the Group Provider section of the script. The label name must remain 'SP' in order for it to retrieve the information correctly. |
Once the script completes successfully, run the following script to refresh the User Manager Cache:
UPDATE [K2HostServer].[Identity].[Identity]
SET [ExpireOn] = GETDATE()
,[Resolved] = 0
,[ContainersResolved] = 0
,[ContainersExpireOn] = GETDATE()
,[MembersResolved] = 0
,[MembersExpireOn] = GETDATE()
GO
Restart the K2 Server to refresh the settings. Once the server has restarted, use K2 Studio to browse to the User Manager and verify that the security label is showing and that the K2 server has populated the LDAP accounts in the context browser. If you receive an error, you can undo your entry by running the K2 LDAP User Manager (Trusted - Remove).sql script in the zip file attached to this article.
Modify the mapping to accommodate the error, rerun the load script and refresh the User Manager cache, and restart the K2 server.
If successful, you should see something similar to the following: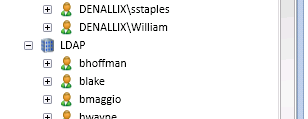
Using the URM Service
Another way to test and utilize the LDAP URM, is to Create the URM Service SmartObject. The instance is already registered; the only thing that needs to be done is to create the SmartObjects from the service type.
Once the SmartObjects are created, you can quickly verify that the correct user information is being retrieved by running the SmartObject Services Tester utility. Browse to the SmartObject Label you created (i.e. URM Service) and expand the User group. Locate the Get Users method as shown on the following screen:

Additional Resources
The K2 Getting Started documentation provides more detailed information regarding configuring the K2 LDAP user manager. It also includes towards the bottom of the page the steps to get the URM up and running. It provides some example scripts and details comments concerning each mapping values.
