K2.net Collaboration Tools Custom Action

  • 24 February 2022
  • 0 replies
  • 15 views

Userlevel 3
Badge +8
 

K2.net Collaboration Tools Custom Action

KB000144

DOWNLOADS
DOWNLOADS
PRODUCT
K2.net 2003
LEGACY/ARCHIVED CONTENT
This article has been archived, and/or refers to legacy products, components or features. The content in this article is offered "as is" and will no longer be updated. Archived content is provided for reference purposes only. This content does not infer that the product, component or feature is supported, or that the product, component or feature will continue to function as described herein.


Article describes how to create and deploy a Custom Action for K2.net Collaboration Tools.

Note: The following process requires developer level skill and competency with K2.net 2003, Microsoft SharePointPortal Server, Visual Studio.NET 2003 and XML.


Overview
The K2.net Collaboration Tools allows SharePoint users to create and execute document approval workflows, entirely within the SharePoint environment, without the need for any development skills or even knowledge of K2.net 2003. These workflows consist of a number of "Stages", each involving the participation of a set of users and/or groups. When the workflow is executed, it will continue until all Stages have been "Approved" (with all Business Rules met) or until a Stage is "Declined".
 
At the completion of a workflow, one or more "Actions" are executed, based on the outcome ("Approved" or "Declined"). The K2.net 2003 Collaboration Tools include standard Actions which can be configured when the workflow is created, including sending an e-mail and copying / moving / deleting a document. A Custom Action can be created, which can be added to these "Approved" or "Declined" Actions, thereby extending the functionality of the K2.net Collaboration Tools.

To create a Custom Action, the following steps are required:
 
  • K2.net Process:  The "Action" is fundamentally a K2.net process which performs the required functionality. For example the "Copy" action is carried out by a K2.net process which copies the document from one location to another. Essentially then, provided K2.net Studio is capable of performing the task; the "Action" is possible.
  • Create the User Control: This step is performed in Visual Studio.NET 2003. Sample code is provided which is used to create the user control, which captures the data required to configure the Action from the user creating the workflow.
  • Integrate the new Custom Action: With previous two steps completed, the new K2.net Process must be exported to the K2.net Server and the User Control must be integrated with the K2.net Collaboration Tools.
Developing The Custom Action Solution
Component Requirements: To create a "Custom Action", your environment must comply with the following pre-requisites.
  • Microsoft SharePoint Portal Server, including the K2.net 2003 Collaboration Tools
  • K2.net 2003, including K2.net 2003 Studio
  • Microsoft Visual Studio.NET 2003
Note: This document assumes that all the required components are installed on a single Server. If this document is being followed in a distributed scenario, you may need to contact your regional K2.net office for further guidance
 
Create The K2.net Process
Note: A sample K2.net process has been provided to assist with the creation of a sample or demonstration Custom Action. This is included in the zip file found at the bottom of this KB Article.
The first step to creating the "Custom Action" is to build a K2.net 2003 process. In addition to the base functionality of that process, include the following process level Data and XML Fields, as listed in the tables below.


Note: The scope of a "Custom Action" is bound by what a K2.net 2003 process is capable of doing.
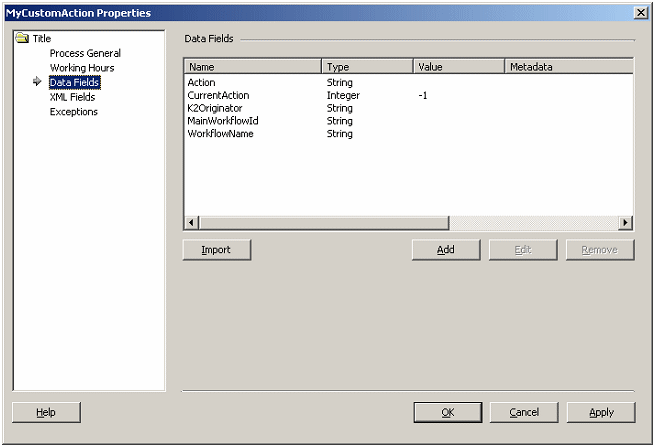
Data Fields
Action Specifies whether the workflow has been Approved or Declined
WorkflowName Contains the name of the process which will start the Custom Action process
MainWorkflowID Contains the process instance ID of the process which started the Custom Action process
K2Originator The originator of the process which started the Custom Action process
Current Action Integer value indicating the order in which this Action is being performed
 
In addition to any other data fields, the required data fields are shown below.


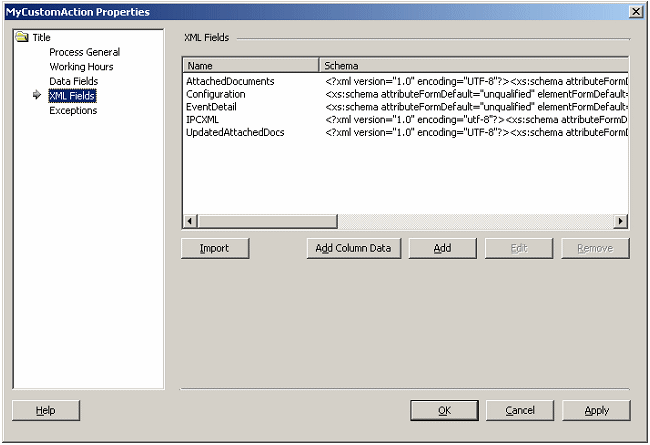
Xml Fields
AttachedDocuments Contains references to the documents attached to the K2.net Collaboration Tools workflow
UpdatedAttachedDocs If a copy or move action has been performed prior to this action being reached, this field will contain the path to the document's new location
Configuration The XML configuration of the K2.net Collaboration Tools process which stated this process
EventDetail Contains information relating to the event which started the process which is calling the custom action process
IPCXML Contains XML data which describes how the custom actions process will be executed
 
In addition to any other process XML Fields, the required process XML Fields are shown below.


Export the K2.net Process
Once the process is completed, including the required process Data Fields and XML Fields, it must be exported to the K2.net 2003 Server.
For this process to work with the K2.net Collaboration Tools as a Custom Action, the "Anonymous" user must be given "Start" and "View" permissions. These permissions are set using the K2.net 2003 Service Manager.
 
Configure the User Control
Note: A sample User Control has been provided to assist the developer to create a sample or demonstration Custom Action. This is included in the zip file found at the bottom of this KB Article
The sample code contains a complete Visual Studio.NET 2003 sample project. This also includes the dependencies (assemblies relating to the K2.net Collaboration Tools) required when creating Custom Actions. To install and open the project, do the following:
 
1)  Unzip the compressed file
2)  Copy the project "SourceCode.CustomActions" to the following location: "c:Inetpubwwwroot"< td>
3)  Open Visual Studio.NET 2003
4)  Click "Open Project" and browse to the directory "c:InetpubwwwrootSourceCode.CustomActions"
5)  Open the project file "SourceCode.CustomActions.csproj"
 
This project can then be compiled. If this compilation is successful (indicating all dependencies are present), required changes can then be made (although it is recommended that changes only be made by someone who has already successfully deployed a Custom Action - such as the sample supplied).
 
Bringing It All Together
 
Once you have created/exported your K2.net process and the User Control has been created/compiled, the final step is to integrate the User Control and the process with the SharePoint Workflow Services part of the K2.net Collaboration Tools.
 
Note:  The SharePoint Workflow Services folder in the K2.net Collaboration Tools should be found at the following location: <Program Files>Common FilesMicrosoft Sharedweb server extensions60TEMPLATELAYOUTSK2V3SharePoint Workflow Services
 
To add the required files for the User Control, do the following:
1)  Copy the custom action user control (the *.ascx file, e.g. K2StartProcess.ascx) into the "Actions" folder of the SharePoint Workflow Services folder
2)  Copy the compiled assembly (the project *.dll file, found in the project's "Bin" folder, e.g. SourceCode.CustomActions.dll) into the "Bin" folder of the SharePoint Workflow Services folder.
If you are using the Custom Action in the sample code, you will also need to copy the "K2MNG.dll" and "K2CSC.dll" file to this location.
To configure the newly added controls, do the following
Add the following lines of XML to the "Panels.ascx" User Control (with the other "Register" tags, near the top), found in the SharePoint Workflow Services folder, to register the new User Control:
 
<%@ Register TagPrefix="uc1" TagName="K2StartProcess" src="Actions/K2StartProcess.ascx" %>
 
Add the following line of code to the bottom of the same file, which adds the user control in a panel on the panel's user control:
 
<asp:Panel id="pnlK2StartProcess" runat="server" Visible="False">
  <uc1:K2StartProcess id="K2StartProcess1" runat="server"></uc1:K2StartProcess>
</asp:Panel>
 
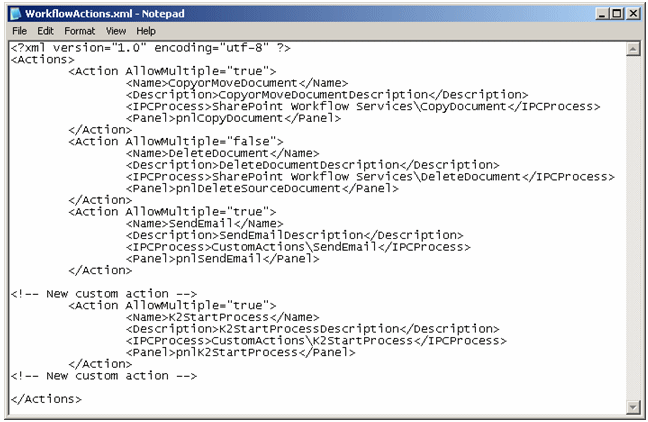
Add the following node to the WorkflowActions.xml file in the "Resources" folder of the SharePoint Workflow Services folder.
 
<Action AllowMultiple="true">
  <Name>K2StartProcess</Name>
  <Description>K2StartProcessDescription</Description>
  <IPCProcess>CustomActionsK2StartProcess</IPCProcess>
  <Panel>pnlK2StartProcess</Panel>
</Action>
 
The table below provides descriptions on the Tags used in the code sample above.
Tag Description
Name The label of the custom action, case and spelling must match an item in the resource file
Description The label of the description, case and spelling must match an item in the resource file
IPCProcess The K2.net process that will be executed (the process for the Custom Action)
Panel The panel to display when the action is selected to be configured (set in Panels.ascx
 
When completed, the WokflowActions file should be similar to the file shown below.


In order for the Custom action to be properly listed from the resource file in the add action list, add the title and instruction labels for the Custom Action into a resource file. If no resource file has been created, one must be created (a resource file is included in the code sample).

Once the satellite assembly has been created from the resource file, place it in a folder called "en-US", beneath the "Bin" folder of the SharePoint Workflow Services folder.
Note:  The name of the destination folder for the assembly is dependant on the cultural / regional settings of your installation.
To create your own resource file, do the following:
  1. Create a resource file with the file name "K2Configurable.resx" (The file name is important!)
  2. Add the labels for your "Custom Action"to the resource file
  3. Convert the Resource file to a binary resource file
    1. Open the from Visual Studio .NET 2003 Command Prompt and navigate to your resource file (e.g. "c:InetpubwwwrootSourceCode.CustomActionsResources")
    2. Enter the following command line instruction from Visual Studio .NET 2003 Command Prompt:
      "resgen K2Configurable.resx K2Configurable.en-US.resources"
    3. To embed the resource file, enter the following:
      "al /t:lib/embed:K2configurable.en-US.resources,SharePointWorkflowServices.Resources.K2Configurable.en-US.resources /culture:en-US /out:SourceCode.SharePointWorkflowServices.resources.dll"
  4. Copy and paste the generated satellite assembly (dll) in the folder named according the regional settings i.e. "en-US" which is found in the "BIN" folder on the K2.net 2003 SharePoint Workflow Services Web Site
If a resource file already exists, update the resource file with the new titles and instruction labels and follow the steps above from step "3". Only one resource file is required, there is NO need to create a second file.
Note: No spacing is allowed in the embedded section. When converting and placing the resource file, the "en-US" denotes the regional culture. For the United Kingdom, it may be changed to "en-GB" (so long as this is consistent throughout the configuration of the Custom Action and SharePoint).
Troubleshooting
Sample Code Compile Errors

If compile errors are encountered with the sample code (especially in the case that no changes were made) it is possible that the K2.net 2003 Collaboration Tools have not been installed on your environment. Ensure that you install all the K2.net Collaboration Tools components, as a number of dependencies (.NET assemblies) are required.


Error When Adding Custom Action
When adding your new Custom Action, if the item in the Actions list is blank (instead of showing the name of your Action) or if you receive an error resembling "String reference not set to an instance of a String. Parameter name: string2", this may suggest a problem with the resource file. This problem could be that the content of the "Name" and "Description" tags in the WorkflowActions.xml file does not match entries in your resource file, or your resource file has not been created / added with the correct region, as per the server's configuration (e.g. "en-US").
 
Installing The Sample Project
Note: You should download the file MyCustomActions.zip. If you experience any difficulties with opening the zip file or extracting the contents, please contact your local K2.net office.
 
K2.net Studio Project
The sample provided is an example "Custom Action". This Custom Action starts an instance of another process as selected by the user. Copy this example project, along with the subdirectory to the location where you K2.net Studio projects are stored. To install this process, follow the instruction in this KB Article.
 
Sample Visual Studio.NET 2003 Code
The example project is a generic template which the developer can use as a basis to create a new "Custom Action". To use the Sample code, follow the instructions in this KB Article.


Note: It is recommended that the Custom Action included in the sample code is installed "as is"; to ensure that all configuration settings are understood. Those confident in their understanding of this process can then go on to create their own Custom Actions.


0 replies

Be the first to reply!

Reply