

How To: Install K2 in Microsoft Azure
KB001801
PRODUCT
You may need to install K2 on a Microsoft Azure-hosted Virtual Machine, utilizing Azure SQL for the K2 database, and without joining the K2 environment to an Active Directory domain (this is also commonly referred to as “Workgroup Mode”). This article describes the requirements and high level steps to undertake this type of installation, and includes links to resources that provide detailed information regarding the setup and configuration of Azure and K2.
Before you Begin
There are a few requirements and suggestions before you begin to install K2 in Azure. You will need:
- An Azure subscription that allows you to create Azure Virtual Machines and SQL Logical servers.
- Valid K2 licenses for the products you wish to install, including K2 blackpearl and possibly K2 smartforms. (You will be using machine keys provided by K2 during the K2 installation to request licenses from K2. Ensure that your organization has licenses that you can use for the installation).
- Experience getting an environment ready for K2, which includes all of the Windows Server technologies that must be installed and configured before you begin your K2 installation. If you can do a single-server installation of K2 from a clean Windows Server base that is not attached to a domain, you will find preparing a fresh Azure-based virtual machine is not difficult.
- Optional: an Azure AD (AAD) directory that you'll be using to authenticate users. Using AAD to authenticate users is optional, but it is very common in Azure-based infrastructures to use AAD as the directory store instead of K2 SQL User Manager. However, using AAD requires some additional post-installation configuration.
- Optional: developer machines that will connect to the Azure-hosted K2 server. These are typically physical workstations used by developers to build K2 applications, and they will deploy these applications to the Azure-hosted K2 environment.
Steps
Use these high-level steps and the links provided to work through the setup and configuration of your K2-Azure environment. We recommend that you read the linked references before you start your installation.
You can use the K2 Hardware requirements and prerequisites topic and available Microsoft resources such as Virtual Machines and Sizes for virtual machines in Azure to identify the appropriate VM size for your installation. K2 recommends using at least the Standard_D2_v2 VM size, but you may need a higher-capacity VM depending on your intended use of K2.
The Microsoft article Create your first Windows virtual machine in the Azure portal is useful to learn how to create a Virtual Machine in Azure.
Ensure that the necessary prerequisites are installed and configured in your Azure Virtual Machine. Much of this information should be familiar to you from your previous installation experiences, and you can consult the Non-AD Workgroup Installation topic in the K2 Installation and Configuration Guide to learn more about the specific configuration of components to support a non-domain installation. At least the following components must be installed and configured in the Azure VM:
a) IIS
b) DTC
c) MSMQ
d) Security Certificates (for more information see Certificate and Internet Requirements in K2)
K2 suggests using at least the Standard S2 Azure SQL Database Service Tier size for your K2 Azure SQL database, but you may need a higher-capacity SQL database depending on your intended use of K2. You can refer to Microsoft resources such as SQL Database for more information on available service tiers and capacity for Azure SQL Databases.
The Microsoft article Get started with Azure SQL Database servers, databases, and firewall rules by using the Azure portal and SQL Server Management Studio is useful to learn how to set up a SQL environment using Azure SQL.
You can use an existing Azure SQL database server (but bear in mind the capacity requirements if you intend sharing this database server with other applications) or create a new database server. You will be using a DAC package to install the K2 database as described below; these instructions assume that you are creating a new database server.
You can refer to the K2 article Creating the K2 database in Azure SQL Database for detailed steps that describe how to use a DAC package to install the K2 database.
Now you can install K2. Installing K2 on Virtual Machines that are hosted in Azure and that connect to a K2 database hosted in Azure SQL follows the same basic installation approach as when the K2 database is located in an on-premises SQL Database. The only difference is that, during installation, you will point the installer to the database in Azure SQL to allow the K2 installer to perform the necessary configuration for the database.
When installing K2 on a Virtual Machine (VM) hosted in Azure, in workgroup mode as opposed to domain-joined mode, you need to install using a local administrative user on the VM, not with the Azure user account. You can consult the Non-AD Workgroup Installation topic in the K2 Installation and Configuration Guide for the steps to take to install K2 blackpearl and K2 smartforms on the Azure-hosted VM. As with all K2 installations, you receive warnings if components are missing or you will not be able to install certain components.
If you wish to utilize Azure Active Directory for authentication, refer to the K2 article Configure SmartForms for Azure Active Directory (AAD) to configure K2 to use AAD as an authentication mechanism.
If you have remote developer machines that need to connect to the Azure-hosted K2 environment, refer to the K2 article Environment Library - K2 Studio or K2 for Visual Studio (scroll to the end and use Method 2 - K2 Studio or K2 for Visual Studio) for information on how to configure these designers with connection strings that point to your K2-Azure environment.
Troubleshooting and Known Issues
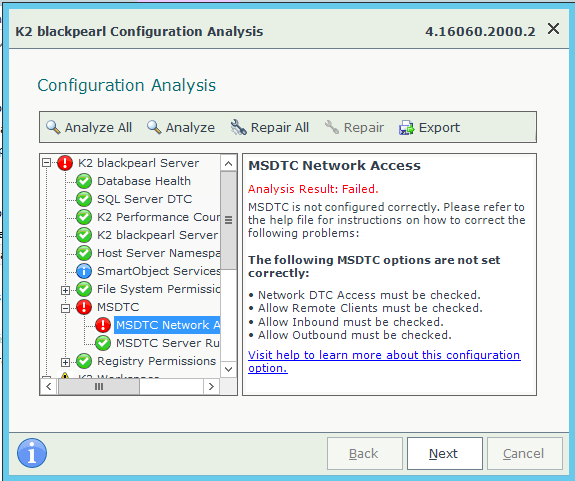
1. Because SQL Azure does not support MSDTC, you may see an MSDTC error during the configuration analysis of the install. This is a known issue that can be ignored.
2. After installing K2, the K2SQL user manager may not be configured. You will not be able to login until you configure SQL User Manager. To check whether SQL user manager is configured, open the HostServer.SecurityLabel table using SQL Management Studio, and look for a K2SQL label in the SecurityLabelName column, as shown below.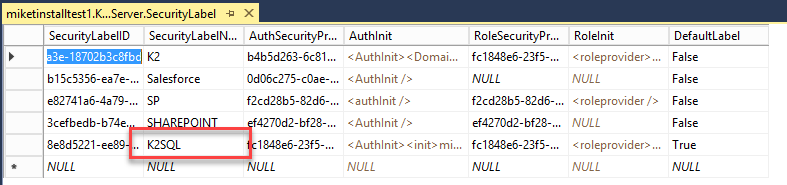
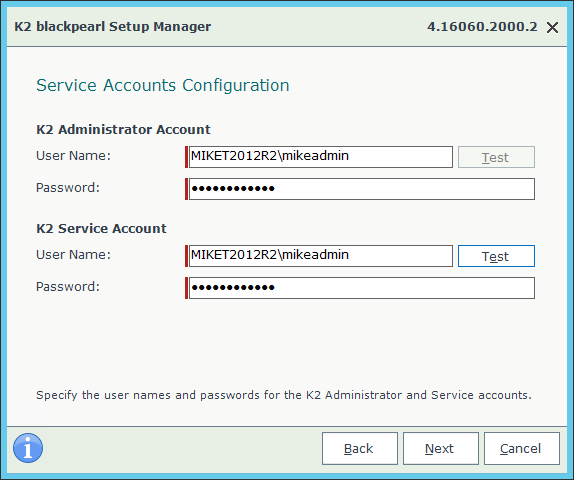
If you do not see the K2SQL security label name, you will have to reconfigure K2 and specify an account that has local VM administrator rights for the K2 Administrator Account in the Service Accounts Configuration page of the Setup Manager. (Note that the Test button is never enabled for the K2 Administrator Account.)
3. If you are not integrating with a mail server you can skip that step in the Setup manager and supply a fake SMTP server address. Note that you will not be able to send email from a workflow unless you have an actual SMTP server. Also, SmartActions do not work unless you configure an Exchange Server. For more information for configuring K2 for Exchange Online see the Microsoft Exchange 2013 and 2016 On-premises and Exchange Online section of How To: Working with K2 Exchange Integration.
