

Overview, Installation, and Configuration of K2 Cloud Secure Data Access
KB002738
PRODUCT
Use this article for an overview of what K2 Cloud Secure Data Access (K2 SDA) is and how you can start using it.
Overview
K2 SDA is a secure mechanism by which you access on-premises data from K2 Cloud. K2 recommends this approach instead of other data access mechanism to query and update data stored on-premises from the cloud.

It is important to keep in mind that K2 SDA does not require a VPN connection from your K2 Cloud tenant to your on-premises environment. Additionally, incoming ports on your network do not need to be opened. Your physical network and internet connection remain safe with this approach, and on-premises assets are protected from the internet; only your K2 Cloud instance can access these on-premises data sources. In the architectural diagram, notice that your servers and data still reside on your LAN and not in the DMZ where they could be more vulnerable to attack.
Common uses of K2 SDA include accessing proprietary, on-prem data sources stored in SQL, web services, and other data sources that K2 Cloud supports using SmartObject services. The SDA Access Controller (represented by the shield in the diagram located on your private network) is a virtual image that you download which, once configured, polls the SDA Access Gateway (represented as the shield next to the cloud) for data requests made in K2 Cloud. This means that only authorized, outbound communication occurs from your network over a secured channel to your K2 Cloud instance. Data is then passed through this secured channel without the need to open ports in your firewall to incoming traffic.
(For more details on K2 SDA, please see the article KB002739: How K2 Cloud Secure Data Access Works .)
Benefits
The benefits of using K2 SDA to connect K2 Cloud to your on-premises data include:
- Reduces the possibility of successful attacks coming from malicious users on the internet
- Eliminates the need to open incoming ports in the internal firewall by using a reverse access technology
- Simplifies managing firewalls and the DMZ
- Eliminates the need to store sensitive data in the DMZ
- Simplifies adding new back-end services
- Eliminates the possibility of users establishing direct connections from an untrusted network to specific hosts in the internal network
- Can provide substantial cost savings by reducing or eliminating DMZ-based servers, both their physical hardware, OS, and application server licenses
Supported Data Sources
You can configure any combination of the following data sources in K2 Cloud that reside on your internal network. For the latest compatibility information, see Product Compatibility, Integration and Support.
- Microsoft SQL Server 2014, 2016, and 2017
- Microsoft Dynamics CRM 2013, 2015, and 2016
- Microsoft Exchange 2013 and 2016
- Oracle 11g (releases 1 & 2) and 12c
- REST web services
- WCF web services
- SOAP web services
- OData web services
Virtual Machine, Password, and Port Requirements
The first action to take for getting your environment ready is to download the virtual machine from the email you receive after purchasing a license. Use the following information on the requirements for this VM and the new passwords you set:
VM Requirements
- 4 vCPUs, 4 GB RAM, 40 GB HD
- Minimum processor type: Intel Xeon E5-2620 @ 2.00 GHz
Password Requirements
Passwords should contain at least 10 characters and meet three out of four of the following rules:
- at least one lower case character
- at least one upper case character
- at least one number
- at least one special character
Port Requirements
You must open the following ports in your firewall to allow outbound traffic:
- 808
- 809
- Also, open the ports for outbound traffic given to you by K2. If this request may take some time to complete, open at least one set of the Callback Ports for outbound traffic that correspond to your LOB.
SQL Server Ports
Open one set of the following Callback Ports for outbound traffic for each SQL Server to which you are connecting. (Note: Only open these ports for outbound traffic, not inbound.)
| External Node Bind Port | Callback Ports |
| 1433 | 1434 & 1534 |
| 1443 | 2443 & 2543 |
| 1444 | 2444 & 2544 |
| 1445 | 2445 & 2545 |
Other LOB Ports
Open one set of the following Callback Ports for outbound traffic for each on-premises LOB to which you are connecting. (Note: Only open these ports for outbound traffic, not inbound.)
| External Node Bind Port | Callback Ports |
| 17000 | 17100 & 18100 |
| 17001 | 17101 & 18101 |
| 17002 | 17102 & 18102 |
| 17003 | 17103 & 18103 |
| 17004 | 17104 & 18104 |
| 17005 | 17105 & 18105 |
| 17006 | 17106 & 18106 |
| 17007 | 17107 & 18107 |
| 17008 | 17108 & 18108 |
| 17009 | 17109 & 18109 |
| 17010 | 17110 & 18110 |
| 17011 | 17111 & 18111 |
| 17012 | 17112 & 18112 |
| 17013 | 17113 & 18113 |
| 17014 | 17114 & 18114 |
| 17015 | 17115 & 18115 |
Installation and Configuration
To install and start using K2 SDA, you must first purchase a license. Once you have done that, the high-level steps that you follow are:
- Download the Open Virtual Appliance (OVA) file which is the virtual image containing the SDA Access Controller. The download link will be provided to you via your Remote Services SDA ticket. You must run this image in your private network, and you can convert it to a different format if necessary using the conversion tool of your choice.
- Once your VM is running, connect to it and log in using the command line interface with the sda user and change your password. The default password is sda1
- On the Main Menu press 2 and press Enter to go into Maintenance
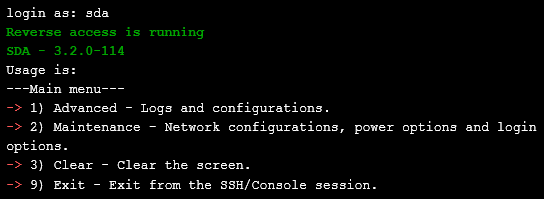
- Press 1 for Networking and press Enter
- Press 2 for Edit and press Enter
- Press 1 and Enter to edit the IPv4 address
- Enter a new internal IPv4 address for the VM and press Enter
- Press 4 for Save Configurations and press Enter and note the message Changes were saved.
- Press 9 and Enter to go back to the Network Settings Menu
- Press 4 for Commit and Enter to commit your changes
- Press 9 and Enter to go back to the Main Menu
- Press 9 and Enter to exit the console session, then y and Enter to log out
- Restart the VM
- Browse to the SDA Access Controller website with the URL https://{the IP address you assigned in step 7}:3000. Login with the admin user and change your password. The default password is rsaccess12345
- Accept the End User License Agreement (EULA).
- Click the plus (+) next to K2 Cloud Secure Data Access to create a new pair
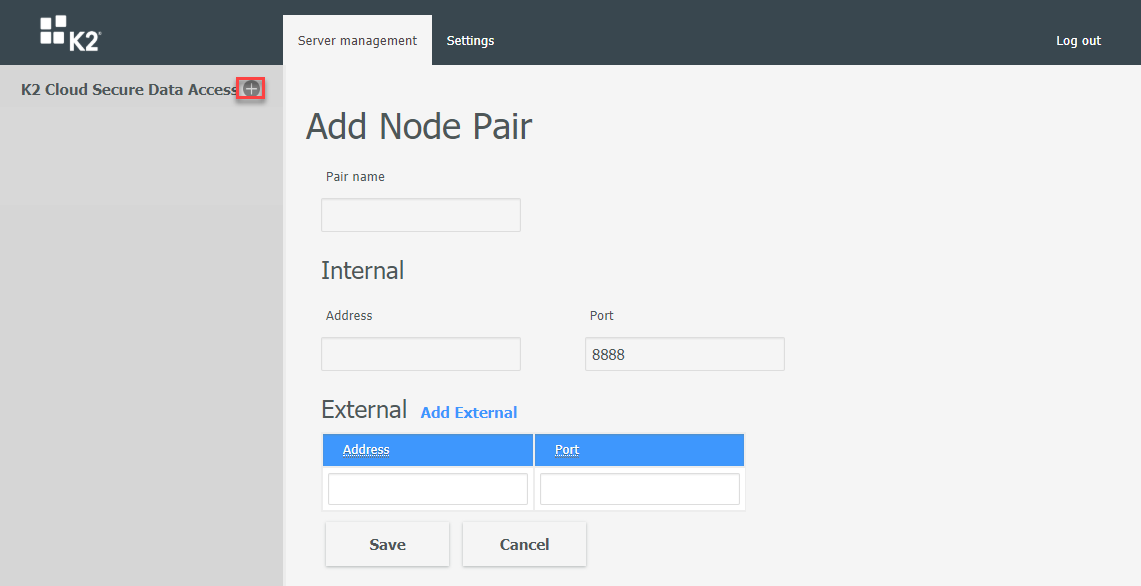
- Give the pair a name that describes the K2 Cloud environment.
- The Internal Address is the IPv4 address of the virtual machine. Enter that IP address and leave the port set to 8888.
- Enter “0.0.0.0” as the External Address and click Save. “0.0.0.0” will be changed to the address of your K2 Cloud tenant during your Remote Services call.
- When the pair is created, you see two tabs at the top of the page – General and License. Select License.
- Enter one hundred (100) for the Number of rules and click Generate License Request.
- Click Copy License Request and add it to your Remote Services ticket.
- Set up a time with your Remote Services contact to complete the configuration. In this call you will:
- Update the External Address(es) for the pair.
- Add a rule for each on-prem data source for access from K2 Cloud.
- Setup your service instances in K2 Cloud for each data source.
- Verify and test that data and communication flow between K2 Cloud and your on-prem data sources is successful.
- If you need to configure additional data sources or change your existing rules at a later point, create a new K2 Support ticket.
If SDA will be used with multiple K2 Cloud environments (Development, Production etc.) a separate SDA Access Controller VM must be provisioned for each environment. While it is possible to create multiple Pairs from the Admin site running on a specific Access Controller, each Pair must point to its own SDA Access Controller (i.e. the Internal address in the above screenshot must be unique for each Pair). This allows you to centrally manage the Pairs and Rules for all K2 Cloud environments from one Access Controller.
See Also
For more information about K2 SDA, see How K2 Cloud Secure Data Access Works
