

Integrating K2 with Google Cloud AI Building Blocks
KB003118
PRODUCTUse this article to learn more about enabling Google Cloud AI Building Blocks for use in your K2 solutions. While this article does not cover using Google AI services, it does show you how to authenticate and configure Google AI services. This article is intended for administrators of K2 and the Google Cloud Platform (GCP) to enable Google Cloud AI Building Blocks for use with the K2 platform.
Prerequisites
It is recommended that you are familiar with the OpenAPI specification before starting. OpenAPI (also known as Swagger) forms the basis of how you configure REST integration in K2, which is what is used to connect K2 to the AI Building Blocks. For more information about working with the REST service broker and Swagger, see Resources for Working with the REST Service Broker.
Getting Started
Before you begin, you need the following items. The recommended items are needed if you plan to create your own custom Swagger definitions and are helpful for troubleshooting communication with REST services.
Required
- K2 administrative account for access to the K2 Management site
- Google cloud platform account
- Google account with administrative rights to a Google Cloud Platform (GCP) project
Recommended
- RESTUnited account
- Postman
Authenticating with Google Cloud Platform
To use Cloud AI Building Blocks with K2, you need a way to authenticate your requests with GCP. One way is by using an API key. You, as a GCP administrator, can get an API key from the GCP console. For more information see Google Cloud > Documentation > Using API Keys.
Getting an API key
- Log into your Google Cloud Platform project https://console.google.com/
- Navigate to the APIs & Services > Credentials panel in the GCP Console
- Select Create credentials, then select API key from the dropdown
- Click the Create button. The API key created dialog box displays your new key
- Click Restrict Key to restrict the use of this key to specific APIs such as Vision, Video, and Translation
- Copy the key to something like NotePad since you will need to use the key value later

Getting a Swagger definition
Before you can configure an instance of the REST broker, you need a Swagger definition file for the endpoints with which you wish to integrate.
It is necessary to create your own Swagger definition for the specific Cloud AI Building Block with which you are integrating. Google does not provide Swagger definitions for the AI Building Blocks, so when you create your own, you can tailor the Swagger definition file to meet your project needs. The K2 administrator and K2 developer should work together to decide what information is needed from the endpoint and create the Swagger definition to meet the project’s use cases.
- You can use tools like RESTUnited.com to generate Swagger definition files for you based on example responses from the services. For more information see Generating a Swagger Descriptor for REST-based Services using RESTUnited.com
- You can also use tools like Postman to test your API calls using the Swagger file. For an example of using Postman see How To: Use Postman to Test the Workflow REST API using OAuth
Hosting the Swagger definition file
Whether you decide to customize the provided Swagger or generate your own, you must upload the file to a location on the Internet that can be accessed anonymously. You can use services such as Azure Blob Storage or Google Firebase.
Configuring an instance of the REST broker for Cloud AI Building Blocks
Once you have an URL for your Swagger definition file, you configure the instance of the REST broker to make those endpoints available in K2 via SmartObjects.
For more detail on configuring the REST broker see REST in the K2 Cloud User Guide.
Configuring Authentication
For the purposes of this article that demonstrates authentication using an API key, you pass the API Key value as a query string parameter in your method calls. Your Swagger definition must include this parameter in every API endpoint method call.
For example, an endpoint method call looks like this:
https://language.googleapis.com/v1/documents:analyzeEntities?key=API_KEY
When using RESTUnited.com to create your Swagger, specify a Key as a parameter on the Request page:

When you specify a Key for the parameter on each call in RESTUnited, you see it on all method definitions in the Swagger as shown here:
“name": "Key",
"in": "query",
"description": "Key",
"required": true,
"type": "string",
"x-example": ""
}
]
To reuse this key in K2 Designer, create an environment field to hold its value and use it in your SmartObject calls. You could instead add it as a Specific value in each SmartObject method definition. For more information see Advanced SmartObjects.
Provide the descriptor location
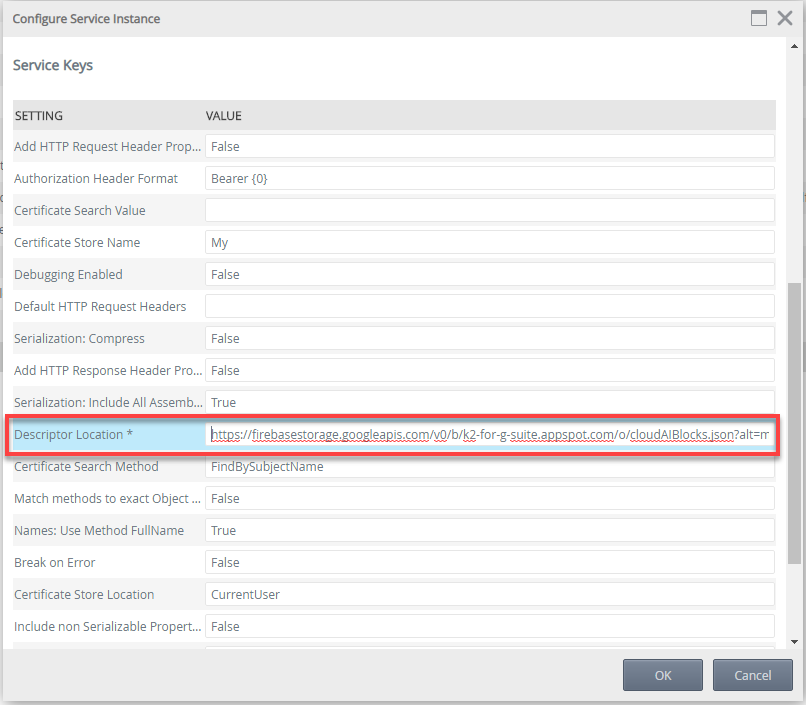
When configuring the instance of the REST broker, you must provide the URL to the Swagger descriptor location. In this example, the ModerationSwagger.json Swagger definition file is saved in a Firebase storage location. Click OK to create the instance.
Next steps
Now that you have registered your instance of the REST broker using the Cloud AI Building Blocks API endpoint, you can create your SmartObjects for use in SmartForms and workflows to call the Google APIs in your K2 solutions. You can use K2 Designer to manually create advanced SmartObjects, or alternatively:
- Navigate to K2 Management > Integration > Service Instances and select the instance you created
- Click Generate SmartObjects from the toolbar
- On the Generate SmartObjects page, check the Select All option and then click OK to create your SmartObjects
