Modifying the current Login page to include custom lock image and company logo
KBS100019
PRODUCTObjective
This is a quick document on which files will be affected, and where to make the changes to create a custom login page.
This document will outline how to change the “Lock” image, add a custom Company Logo and to change the Text on the Sign In section.Before You Begin
Keep a backup of the following files just in case you require rolling back:
K2 blackpearlWebServicesIdentityStsFormsViewsAccountLogIn.cshtml
K2 blackpearlWebServicesIdentityStsFormsStylesPlatinumCSSlogin.css
K2 blackpearlWebServicesIdentityStsFormsApp_GlobalResourcesIntroduction.resx
K2 blackpearlK2 smartforms Runtime_trustlogin.aspx
K2 blackpearlK2 smartforms RuntimeStylesPlatinumCSSlogin.css
K2 blackpearlK2 smartforms RuntimeApp_GlobalresourcesIntroduction.resx
How-to Steps
STEP 1
All custom images can be saved into the following folders:
K2 blackpearlWebServicesIdentityStsFormsStylesPlatinumImagesIcons
K2 blackpearlK2 smartforms RuntimeStylesPlatinumImagesIcons
Here you can see 2 images that I will be using in the example:
![]()
STEP 2
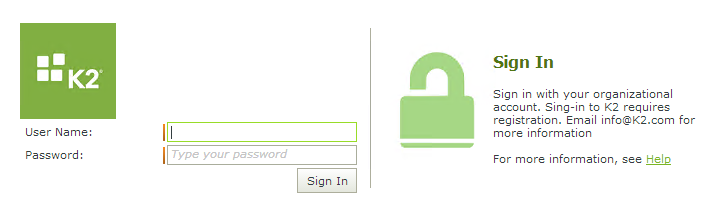
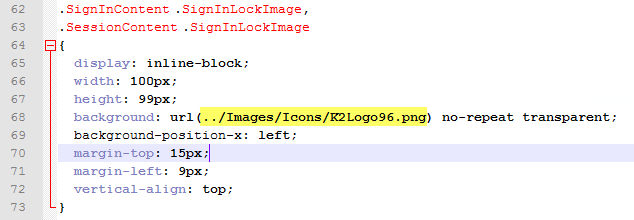
To make changes to the “Lock” on the Login pages navigate to the following files:
K2 blackpearlWebServicesIdentityStsFormsStylesPlatinumCSSlogin.css
K2 blackpearlK2 smartforms RuntimeStylesPlatinumCSSlogin.css
Search for the following:
“.SignInContent .SignInLockImage”
Locate the image URL and change it to the file name of your Lock Image:
STEP 3
To add a Custom Company Logo add a section in the following files:
K2 blackpearlWebServicesIdentityStsFormsStylesPlatinumCSSlogin.css
K2 blackpearlK2 smartforms RuntimeStylesPlatinumCSSlogin.css
.SignInCompContent .SignInCompanyImage,
.SessionContent .SignInCompanyImage
{
width: 100px;
height: 99px;
background: url(../Images/Icons/k2LoginLogo.png) no-repeat transparent;
}
In the following files make the following changes:
K2 blackpearlWebServicesIdentityStsFormsViewsAccountLogIn.cshtml
K2 blackpearlK2 smartforms Runtime_trustlogin.aspx
Search for the following:
<div class="SignInForm">
Add the following text below it:
<div class="SignInCompContent">
<div class="SignInCompanyImage"></div>
</div>
STEP 4
To change the text next to the Lock on the Select Login Method page, open the following file:
K2 blackpearlWebServicesIdentityStsFormsApp_GlobalResourcesIntroduction.resx
Search for the following:
“Sign in with your user name and password to access this site. If you do not have access, contact your administrator.”
Change this text to the desired text
To change the text next to the Lock on the Forms STS Login Page , open the following file:
K2 blackpearlWebServicesIdentityStsFormsApp_GlobalResourcesIntroduction.resx
Search for the following:
“Sign in with your user name and password to access this site. If you do not have access, contact your administrator.”
Change this text to the desired text.
STEP 5
Save all the files that was changed and refresh the Browser.