

Configuring MS SQL for AlwaysOn Automated Failover of the K2 Database.
KB001572
PRODUCT
Introduction
The K2 Installer is not able to configure Microsoft SQL AlwaysOn for automated failover management of the K2 database. Please see the Service Master Key, Database Master Key & Symmetric Key section at the end of this article for a detailed explanation. It is possible, however, for the database administrator to manually create the MS SQL AlwaysOn configuration for an automated failover of the K2 database. This article will give the configuration steps needed to setup the Service Master Key settings, and the Availability Group configuration for the MS SQL Always On automated failover configuration.
This article requires that you directly modify the K2 database. If done improperly or on the wrong version of K2, modification of the K2 database definition, permissions or content may result in system instability or system failure. It is highly recommended to make backups of the K2 database prior to performing any modification. (If available, K2 recommends that you also test database modifications in a non-production environment first.) If you have any concerns, please contact K2 Support before proceeding.
Configuration Steps
-
- Backup the Service Master Key on the first Microsoft SQL server (SQL01) and restore it on all other MS SQL servers that will be part of the AlwaysOn Availability Group (SQL02 in this example).
- It is recommend that the SQL Server service account is the same on all servers that will be part of the Availability Group, otherwise the Service Master Key Restore will fail with the error “The master key file does not exist or has invalid format.” For more information, see http://technet.microsoft.com/en-us/library/ms189060.aspx.
- If this is not possible, then use another single account called “domaininstall” to configure the failover cluster, Availability Group and to backup/restore Service Master Key.
- It is recommended that this configuration is performed before adding any database to these MS SQL servers.
- For existing MS SQL servers for K2, you may need to use the FORCE option (which comes with a warning of data loss to existing third party encrypted databases).
- Create a blank test database on the SQL01 server in FULL RECOVERY mode.
- Create a full and transactional backup of that test database.
- Restore that backup on the SQL02 server with the NORECOVERY option (for more information see http://technet.microsoft.com/en-us/library/ff878349.aspx).
- Configure the Availability Group for all the MS SQL servers (for more information see Microsoft’s TechNet or MSDN help sites, for example see http://technet.microsoft.com/en-us/library/ff878265.aspx).
- Create an Availability Group Listener (for example, see http://msdn.microsoft.com/en-us/library/hh213080.aspx).
- Start the K2 Setup Manager and use the listener/port combination from step 6 as the K2 database server. This will create the K2 database on SQL01.
- Install the rest of the K2 system as needed (K2 smartforms, K2 for SharePoint, etc.).
- Ensure that the K2 system is functioning as expected before proceeding further.
- Stop the K2 service and create a backup (full and transaction log) of the K2 database and restore that backup on the SQL02 server with the NORECOVERY option.
- Sync the user permissions to SQL02 manually (as the K2 Setup Manager will only do this on the SQL01 server during the installation configuration).
- Add the K2 database to the Availability Group that was created in Step 5.
- Use “Join only” as the Initial Data Synchronization (this is the recommended approach, rather than “Full” synchronization, as you have already restored the database).
- Backup the Service Master Key on the first Microsoft SQL server (SQL01) and restore it on all other MS SQL servers that will be part of the AlwaysOn Availability Group (SQL02 in this example).
- Remove the test database from the Availability Group.
- Start the K2 service and do a manual failover to test the configuration.
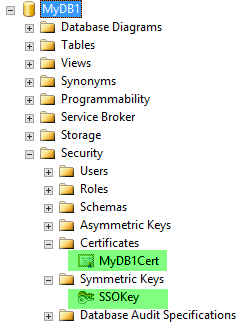
Service Master Key, Database Master Key & Symmetric Key
In this section, a sample database ‘MyDB1’ that has one table [Customer], is used to explain the basic concepts of why a manual configuration of the AlwaysOn automatic failover is necessary.
CREATE TABLE [dbo].[Customer](>
[Name] [nchar](10) NULL,>
[name_encrypt] [varbinary](max) NULL
On the Current primary replica, we see the Service Master Key (SMK)
SELECT * FROM sys.symmetric_keys

Create the Database Master Key (DMK) on ‘MyDB1’
CREATE MASTER KEY ENCRYPTION BY PASSWORD = 'XXXXXXXX-XXXX-XXXX-XXXX-XXXXXXXXXXXX';
CREATE CERTIFICATE MyDB1Cert WITH SUBJECT = 'MyDB1 Certificate', START_DATE = '01/01/2007', EXPIRY_DATE = '01/01/2020'
CREATE SYMMETRIC KEY SSOKey WITH ALGORITHM = AES_256 ENCRYPTION BY CERTIFICATE MyDB1Cert
SELECT * FROM sys.symmetric_keys

Create a full backup, followed by a transaction log backup of MyDB1 database and restore it on the secondary replica. This will copy/restore the database master key, certificate and symmetric key as well. Switch to the primary replica and encrypt some random string.
Use either of these queries to test:
| USE MyDB1 OPEN SYMMETRIC KEY [SSOKey] DECRYPTION BY CERTIFICATE MyDB1Cert; GO INSERT INTO [dbo].[Customer] VALUES ('random', encryptbykey(key_guid('SSOKey'), 'random' )) GO CLOSE SYMMETRIC KEY [SSOKey]; GO | USE MyDB1 OPEN SYMMETRIC KEY [SSOKey] DECRYPTION BY CERTIFICATE MyDB1Cert; GO SELECT encryptbykey(key_guid('SSOKey'), 'MyData' ) GO CLOSE SYMMETRIC KEY [SSOKey]; GO |
Result:
0x00D56CD8518C844AA48BDE418A60DD4D01000000EABB4A4D005880A02F541E75FB78E29D0F604397962E943D

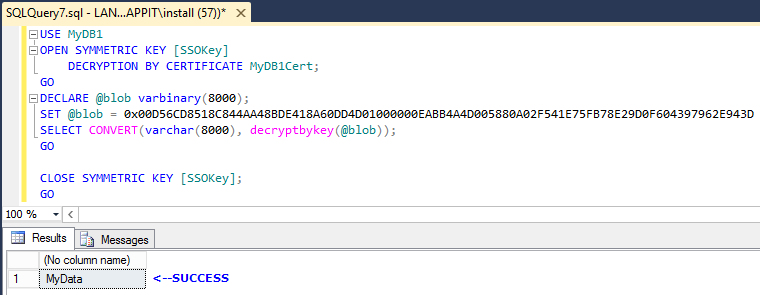
| USE MyDB1 OPEN SYMMETRIC KEY [SSOKey] DECRYPTION BY CERTIFICATE MyDB1Cert; GO SELECT Name, CONVERT(varchar, DecryptByKey(name_encrypt)) FROM [dbo].[Customer]; CLOSE SYMMETRIC KEY [SSOKey]; GO | USE MyDB1 OPEN SYMMETRIC KEY [SSOKey] DECRYPTION BY CERTIFICATE MyDB1Cert; GO DECLARE @blob varbinary(8000); SET @blob = 0x00D56CD8518C844AA48BDE418A60DD4D01000000EAB B4A4D005880A02F541E75FB78E29D0F604397962E943D SELECT CONVERT(varchar(8000), decryptbykey(@blob)); GO CLOSE SYMMETRIC KEY [SSOKey]; GO |
Result:
Explanation
The Service Master Key is used to encrypt Database Master Keys, linked server passwords and credentials. It is the root of the SQL Server encryption hierarchy. The Service Master Key directly or indirectly secures all other keys in the tree. The Database Master Key is a database scoped symmetric key that is encrypted by the Service Master Key and stored in the database. It can be used to encrypt certificates and/or asymmetric keys within the database. If a database makes use of a Database Master Key, and that key is encrypted by the Service Master Key, then this encryption will need to be regenerated on the destination instance after any migration.
In order to verify this, run the following query.
SELECT name FROM sys.databases WHERE is_master_key_encrypted_by_server = 1

The "is_master_key_encrypted_by_server" column of the sys.databases catalog view in the master table indicates whether the Database Master Key is encrypted by the Service Master Key. So, after moving databases, the Database Master Key must first be opened using its password, then the ALTER MASTER KEY ADD ENCRYPTION BY SERVICE MASTER KEY statement can be used to add the Service Master Key encryption.
Run the following query on the secondary replica:
OPEN MASTER KEY DECRYPTION BY PASSWORD = 'XXXXXXXX-XXXX-XXXX-XXXX-XXXXXXXXXXXX';
ALTER MASTER KEY ADD ENCRYPTION BY SERVICE MASTER KEY
CLOSE MASTER KEY
GO

Re-run the above query to check if the decryption works now.
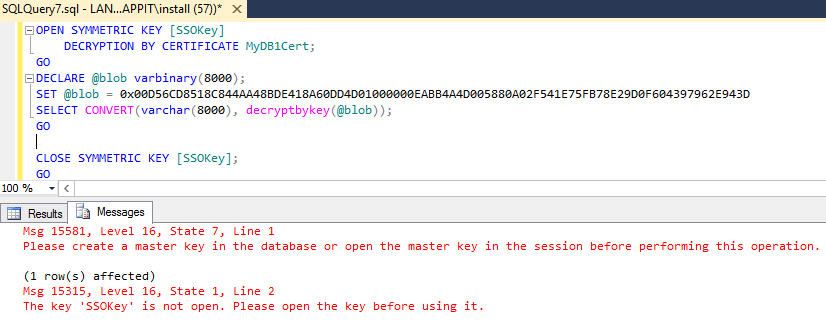
When the same is done in the scope of SQL AlwaysOn Availability Group, we cannot alter the Database Master Key on the secondary replica because it will be in read-only mode.
So, we have to do a manual failover to secondary replica to bring it out of read-only mode. After the failover, the ‘ALTER MASTER KEY’ operation will succeed and we will be able to decrypt the data. However at the same time, the changes to the Database Master Key on the second SQL server (new primary) are synced to the first SQL server. When the next failover occurs on the first SQL server, we have to redo the ‘ALTER MASTER KEY’ operation on the first SQL server, otherwise the replica cannot decrypt the data. To overcome this manual intervention requires some initial planning when setting up the SQL AlwaysOn Availability Group for databases that have encryption. Before adding any databases to the SQL servers, ensure the Service Master Key is the same on all the SQL servers. If you do this after the databases are added, there might be data loss.
On the first SQL server, run the following to backup the Service Master Key
TO FILE = 'C:SQLBackupKeysservice_master_key'
ENCRYPTION BY PASSWORD = 'XXXXXXXXXXXXXXXXXXXXXXXX';
Reference: http://technet.microsoft.com/en-us/library/ms190337.aspx
On all other SQL servers, restore the backed up Service Master Key from the first server.
FROM FILE = 'C:SQLBackupKeysservice_master_key'
DECRYPTION BY PASSWORD = 'XXXXXXXXXXXXXXXXXXXXXXXX';
GO
If you are restoring the Service Master Key after you have added the databases, you may need to add the FORCE parameter to the restore query.
Reference: http://technet.microsoft.com/en-us/library/ms187972.aspx
Once this is done, the Service Master Key on all the servers will be identical. You can now add the databases to Availability Group. When the failover occurs to some other SQL server, the symmetric key can be opened because the Service Master Key is the same as the old primary replica.
