| 6) | Double click on the checkbox (chkK2) to view the code behind the control. Place the following code in the "Click-event" of the check box: |
| |
| Visual Basic 6
Private Sub chkK2_Click()
If chkK2.Value = vbChecked Then
fraK2.Enabled = True
txtK2ServerName.Text = GetSetting("Kofax", "K2", _"UseValue", "")
If Len(txtK2ServerName.Text) = 0 Then
txtK2ServerName.Text = GetSetting("Kofax", "K2", _"StoreValue", "")
End If
Else
fraK2.Enabled = False
txtK2ServerName.Text = ""
SaveSetting "Kofax", "K2", "UseValue", ""
End If
End Sub
|
| 7) | Place the following sub procedure in the code: |
| Private Sub SaveK2Settings()
If chkK2.Value = vbChecked Then
SaveSetting "Kofax", "K2", "UseValue", _txtK2ServerName.Text
SaveSetting "Kofax", "K2", "StoreValue", _
txtK2ServerName.Text
Else
SaveSetting "Kofax", "K2", "UseValue", ""
SaveSetting "Kofax", "K2", "StoreValue",_
txtK2ServerName.Text
End If
End Sub |
| | In the click events of both the "cmdOK" and the "cmdApply" buttons, add the following code to the existing code: |
| Call SaveK2Settings |
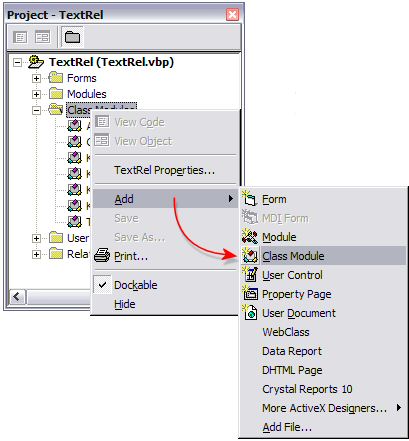
| 9) | Add a new class module: |
| 9.1) | Right click on the folder in the "Project Explorer" labeled "Class Module" |
| 9.2) | Select "Add>Class Module" |
| 
|
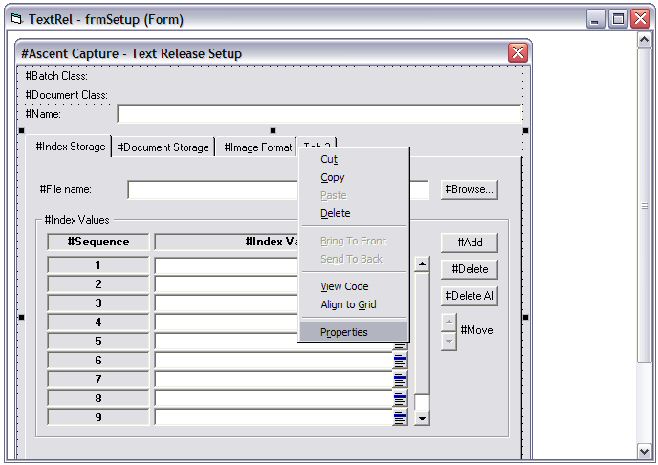
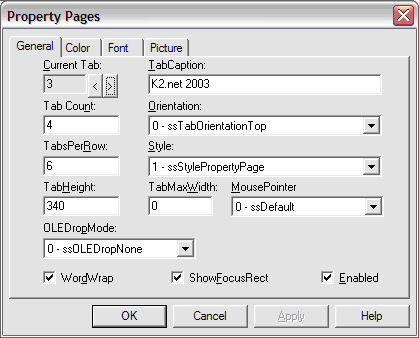
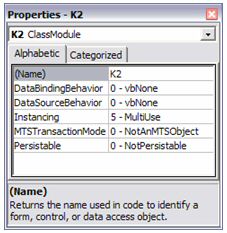
| 10) | Configure the properties for the new class as shown below: |
| 
|
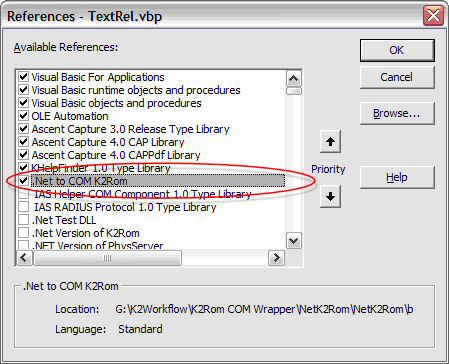
| 11) | Add a reference to the .NET assembly created previously: |
| 11.1) | Click on "Project>References" |
| 11.2) | In the references window, enable the .NET to COM K2Rom object. |
| 
|
| 12) | In the code window of the K2 class, place the following code: |
| Option Explicit
Private moTempClass As NetK2Rom.NetK2Rom
Private moTemp As NetK2Rom.iK2ROM
Public Sub K2StartProcess(ByRef LastName As String, _
ByRef FirstName As String)
Set moTempClass = New NetK2Rom.NetK2Rom
Set moTemp = moTempClass
Dim szServerName As String
szServerName = GetSetting("Kofax", "K2", "UseValue", "")
Dim sDataFieldNames As String
Dim sDataFieldValues As String
sDataFieldNames = "FirstName,LastName"
sDataFieldValues = FirstName & "," & LastName
Dim bCreateProcess As Boolean
Dim sOut As String
With moTemp
.Server = szServerName
.Folio = "Kofax - " & FirstName & " " & LastName
.Project = "KofaxTest"
.Process = "Kofax"
.DataFieldsCommaDelStrNames = sDataFieldNames
.DataFieldsCommaDelStrValues = sDataFieldValues
bCreateProcess = .CreateProcess
sOut = .Data
End With
End Sub |
| 13) | Open the code window for the class ASCIITextFile. Double click on the class in the "Project Explorer" window. Declare the following two variables in the ReleaseIndexes procedure: |
| Dim K2FirstName as String
Dim K2LastName as String
|
| Place the following code at the end of the loop as indicated by the image below: |
| 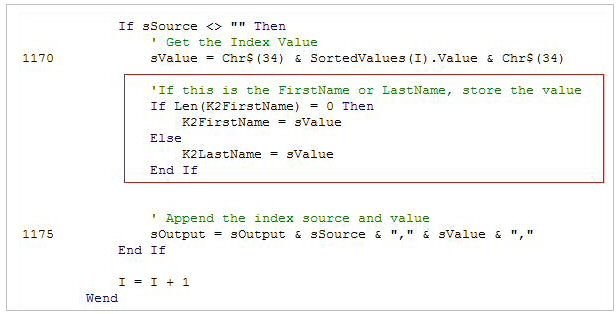
'If this is the FirstName or LastName, store the value
If Len(K2FirstName) = 0 Then
K2FirstName = sValue
Else
K2LastName = sValue
End If |
| Place the following code just before the error handling starts as indicated by the image below: |
| 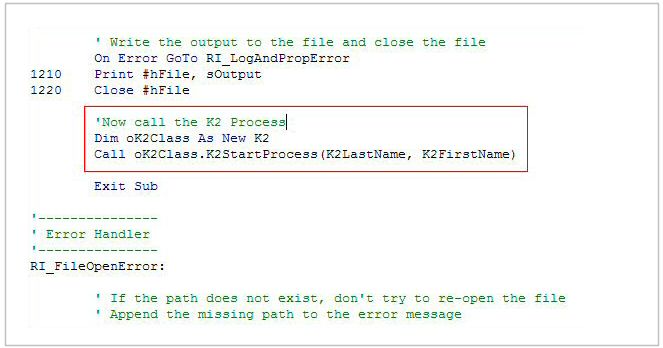
'Now call the K2 Process
Dim oK2Class As New K2
Call oK2Class.K2StartProcess(K2LastName, K2FirstName) |
| 14) | The dll must now be recompiled. However, since the dll is registered, the dll must be de registered before the re compile can take place. The dll will be re-registered automatically once the compilation is complete with no errors. |
| 14.1) | De-register the current DLL found in the bin directory in the Kofax Ascent installed directory (by default "C:\Program Files\Ascent\Bin") |
| 14.1.i) | To do this, click "Start>Run"., and type in the following command (make sure no instance of Kofax Ascent using this DLL is running): |
| 14.1.ii) | regsvr32 -u "C:\Program Files\Ascent\Bin\TextRel.dll" |
| 14.2) | Compile the TextRel.dll. In the VB6 environment. |
| 14.2.i) | Click on "File> Make TextRel.dll." |
| 14.3) | The DLL has been registered when it was compiled according to the location where it was created. It therefore needs to be unregistered and moved to the bin directory of Kofax Ascent. To do this, follow the steps in a.i) above, changing only the path to the correct location where the DLL was just compiled. |
| 14.4) | Browse to the directory where the DLL was created, copy it and paste it in the Kofax Ascent bin directory. It is advised to make a backup of the current TextRel.dll before replacing it with your newly created DLL. |
| 14.5) | Register the DLL by doing the following: |
| 14.5.i) | Click "Start>Run". |
| 14.5.ii) | Type in the following command:
"regsvr32 C:\Program Files\Ascent\Bin\TextRel.dll" |
Back to Top  |
| |
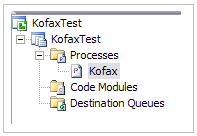
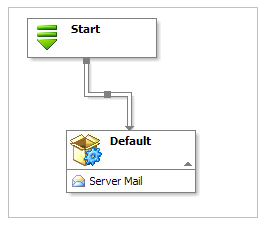
| Step 3 - Create K2.net 2003 Process |
| Create a K2.net 2003 project called KofaxTest. Add a process called Kofax with two data fields, "FirstName" and "LastName", both of type string. |
 |
| Add a "Default Activity" to the canvas and place a "Server Mail" event in the activity. Configure the Server Mail event to send an email to the originator. Allocate the two data fields values in the body of the email. |
 |
| Once complete, export the process ensuring that there are no errors. |
Back to Top |
| |
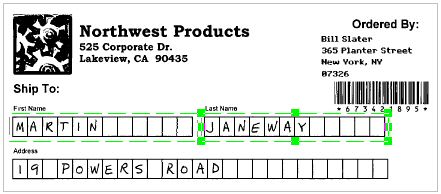
| Step 4 - Setup a batch in Kofax Ascent for scanning and release. |
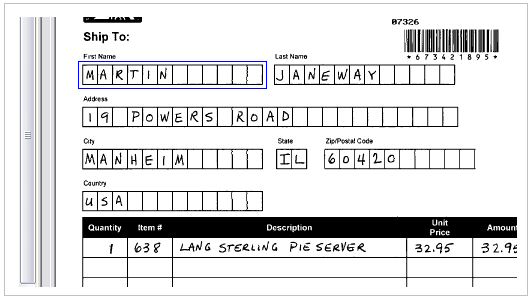
| In this example, a batch is created which automatically recognizes the first name and the last name contained in the document. To setup the batch, do the following: |
| 1) | Open the Ascent Capture Administration module |
| 2) | Click on the "Field Types" tab on the "Definitions", and right click anywhere on the panel and a context menu will appear |
| 3) | From the context menu, select "New Field Type". The Create Field Type dialog box will appear |
| 4) | Now add Field Type with the following properties: |