Configure K2.net 2003 Workspace Web Service to use Integrated Security

  • 24 February 2022
  • 0 replies
  • 8 views

Userlevel 3
Badge +8
 

Configure K2.net 2003 Workspace Web Service to use Integrated Security

KB000150

PRODUCT
K2.net 2003
TAGS
IIS
Microsoft SQL
LEGACY/ARCHIVED CONTENT
This article has been archived, and/or refers to legacy products, components or features. The content in this article is offered "as is" and will no longer be updated. Archived content is provided for reference purposes only. This content does not infer that the product, component or feature is supported, or that the product, component or feature will continue to function as described herein.

In most production environments having user credentials in clear text is considered a security risk. This article will elaborate on how to configure K2.net Workspace web service to use Integrated Security when connecting to the K2 databases to retrieve data for the Workspace reports.


The following components need to be configured to enable the K2.net 2003 Workspace web service to use Windows Integrated authentication to connect to the SQL server

Application Pool

The application which opens the SQL Connection requires a domain account. Therefore, the K2.net Workspace web service requires a specific identity or domain account to connect to the SQL Server. The IIS application pool therefore, under which the K2.net Workspace web service runs requires the domain account.
 
To configure the domain account, follow the steps below:
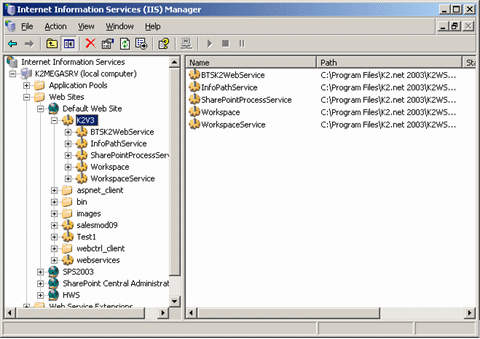
  1. Open Internet Information Services (IIS) Manager, and determine under which application pool (the default is ".Default Web Site > K2V3 >. ") the K2.net 2003 Workspace web service runs:
    • Expand the Local Computer node
    • Then, expand the "Web Sites" node
    • Expand the web site where K2.net Workspace web service has been installed (usually "Default Web Site"
    • Expand the "K2V3" site
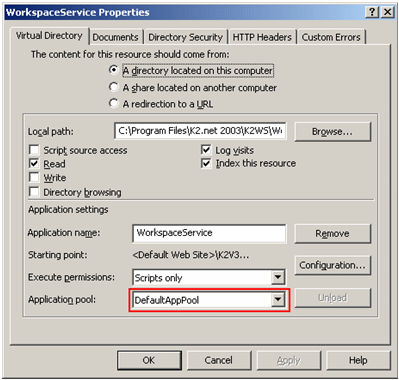
    • Right-click on the "WorkspaceService" node and select "Properties". The application pool will be listed in the "Virtual Directory" tab
    • Click "Cancel" to close this dialog box
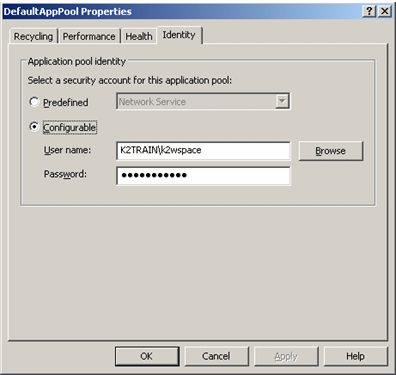
  2. Locate the "Application Pools" node, right-click on the pool noted above and select "Properties"
  3. In the "Identity" tab, click the "Configurable" radio button and enter the service account name and password. In the example shown below, the service account name is "K2WSpace" and the domain name is K2Train
    • Click "OK" and when prompted, re-enter the password
    • Click "OK" again to complete the process
  4. Stop and Start the application pool. It is also recommended that you restart IIS.
     
    Important: The account that starts the application pool has to be added to the IIS_WPG group before it is allowed to start a process. If not, the application pool will fail to start and the following error message will be displayed:
    The account will also need "Modify" permissions on the following directories:
    • <%SystemRoot%>Temp
    • <%SystemRoot%>Microsoft.NETFramework<%FrameworkVersion%>Temporary ASP.NET Files

    By default the IIS_WPG group has permissions on the Temporary ASP.NET Files folder, but not on the Temp directory; ensure that it is configured accordingly
SQL Server
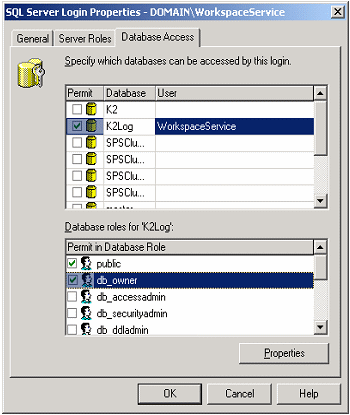
The SQL Login used by the K2.net Workspace Web Site only requires access to the K2.net Log database. This Login should have the "db_owner" database role on the K2.net Log database.
  1. In Enterprise Manager under the Security>Logins section
  2. Locate the SQL Login that will be used by the K2.net Server and double click the login
  3. Click on the Database Access tab
  4. Click on the K2.net Log database and check the checkbox next to "db_owner"
     
  5. Click OK. The login used by the K2.net Workspace Web Site will now have the required permissions on the K2.net Log database
K2.net Workspace Web Service
The last step is to configure the web service to open a connection using the application pool's credenti

1. Open the web service's web.config file, usually located in <%K2WS_Dir%> WorkspaceService
2. Locate the key/value pair in the ConfigSettings node called "DSN". If SQL authentication was specified when the installer ran, it will look like the following:


<add key="DSN" value="Data Source=MySQLServer; initial catalog=K2Log; User ID=mySQLUser;Password=myPass;"/>


3. Change the connection string to use integrated security


<add key="DSN" value="Data Source=MySQLServer; initial catalog=K2Log; Integrated Security=SSPI;"/>


4. Next, find the identity key in the system.web node and change the value to be false


<identity impersonate="false"/>


5. Restart IIS


0 replies

Be the first to reply!

Reply